

Do you want to create a child theme in WordPress?
That’s cool. This isn’t quite something a WordPress novice will enroll in.
For those of you who aren’t familiar with WordPress child themes, let me clear things up a bit. A child theme is a WordPress theme that inherits the style, features, and functionality of another WordPress theme aka the parent theme. You can customize the child theme without changing the parent theme.
For example, the Colibri theme has 7 more child themes: Althea, Brite, Teluro, Skyline, Magnus, Oasis, and Calliope.

Here’s another theme that has child themes: Storefront. Storefront is a WooCommerce theme that you can use to build online stores and has 14 child themes for various business niches.
Now, why would you need a child theme?
Let’s find out below.
Why would you need a WordPress child theme?

Now, WordPress parent themes have lots of files in their backend: PHP, CSS, Javascript, and more. The moment the parent theme gets updated by the theme developer, all these files get replaced. In the case of the child theme, the files do not get changed. This means that child themes protect any changes from getting overwritten when the theme gets updated.
Now, if you are adding your own CSS through the WordPress additional CSS options, your code is safe, even if you are using a parent theme.
There are several opinions in the WordPress community. Some developers urge you to always use a child theme on every website, others say you don’t need to do that. The main reason for the latter opinion is that if you do not make changes to the theme’s files, you’re just fine. And you could always add custom CSS separately.
Yet, we often encounter support issues where people make changes to their PHP file, and stuff doesn’t go well afterward…
So, maybe you just wanna play it safe…
Now, you can create a child theme on your own, or use a WordPress child theme plugin. In both cases, you still need to be tech-savvy in order to create a child theme.
Introducing the WordPress Child Theme Configurator
Child Theme Configurator is a WordPress plugin that allows you to analyze any theme for common problems, create a child theme, and customize it. Furthermore, it lets you identify and override the exact CSS attributes you want to make changes to. The plugin has over 300,00 active installs and a good user rating on wordpress.org.
Before working with the plugin you need to know that a child theme does not function on its own. You need to have the parent theme installed as well. Because, in the back, WordPress first reads the active theme’s stylesheet (style.css) to get the theme’s “header” properties. The active theme will be the child theme. Next, WordPress checks if the theme has a functions.php file and executes it if it exists.
How to create a WordPress child theme without a plugin
First thing first: choose a WordPress theme that matches your goals and the vision you have for your website. The fewer changes you need to make, the better.
When you create a WordPress child theme you won’t be able to avoid writing some code: HTML, CSS, and or PHP. If it helps, you should know that a lot of code snippets are already available and you just need to copy and paste some of them.
Now, the recommendation is that you don’t straight live with the changes. Start working locally, and use dummy content at first.
Let’s start.
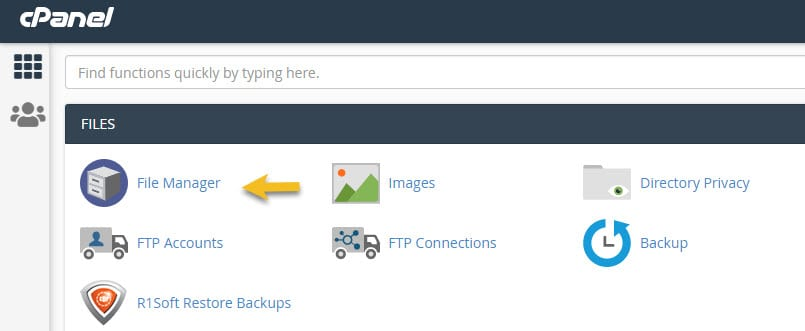
- Login to your cPanel,
- Go to File Manager,
- Locate public_html -> wp-content -> themes folder.
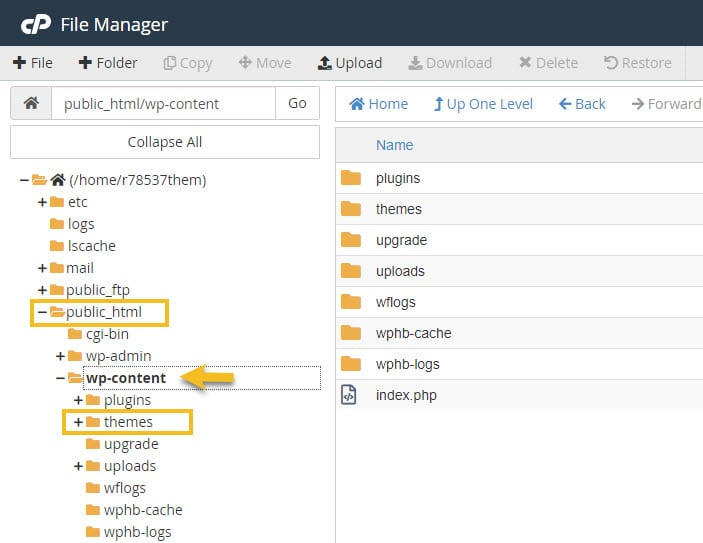
- Inside the “Themes” folder, create a new folder from “+Folder” in the upper menu. Give your folder a name. A best-case practice is to use the name of the theme, to which you append “-child”. Also, use hyphens, instead of space. In my case, I’m going to use mesmerize-child, because I’m using the Mesmerize theme,
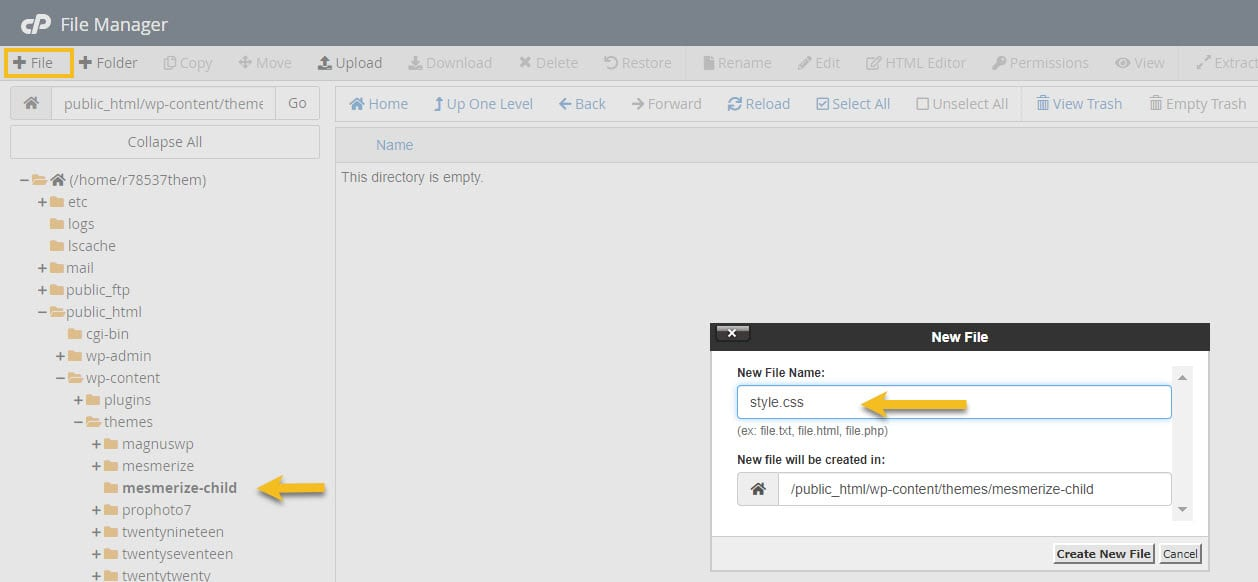
- Inside the newly created folder, create a new file and call it “style.css”.
- Right-click on the file and select the “Edit” option.
Here you can paste some of the code in the parent CSS file, or add your own styling.
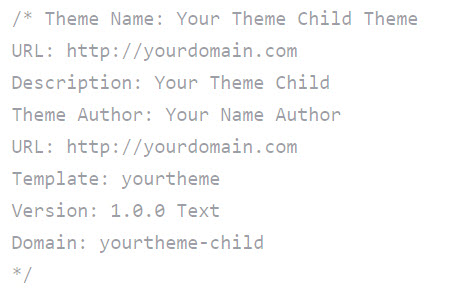
- Change the theme and domain names in the CSS code, then hit “Save”,
- Create another file in the same folder. This time name it “functions.php“. Paste the following code:

When everything’s done, go to the WordPress Dashboard -> Appearance -> Theme. Your child theme will be there, you just have to activate it. This is it! It’s up to you now to add your own code to the newly created functions.php and style.css files.
Now that you have your own child theme, you can also create a custom page template. Here’s how it’s done.
We hope this tutorial gave you the proper know-how on how to create a WordPress child theme. Stay tuned for more WordPress articles on the Kubio blog.
If you liked this article, and want to have access to similar content, make sure to subscribe to our YouTube Channel. You can also follow us on Facebook.