Whether you’re interested in what your friends wanna watch during a movie night (outside a pandemic), or what your users think about your website redesign or your product offering, surveys are often a reliable way to discover what people want and/or think.
For businesses, surveys can provide valuable insights into user behavior that can be used for better decision-making.
So, businesses can use surveys to:
- Collect feedback
- Test product prototypes
- Spot trends
- Understand different customer groups
and more.
Now, if you are running surveys for your WordPress site, here’s what you’ll learn today:
- Which are the best WordPress survey plugins
- How to build a strong survey
- How to use Google Forms
So, let’s get going.
How to create WordPress surveys using plugins
As you’ve probably figured it by now, you’ll need to use a WordPress plugin in order to create a survey. But how do you assess which plugin is the best for you?
Well, when selecting a plugin to design your WordPress survey, there are some features you might want to look into:
- CRM integration. Let’s say you’re using Hubspot as your CRM, can the tool send the user data into the CRM? This will save you tons of manual work. Make sure that you check the plugin’s integrations.
- Export features. Make sure you can export the data to external tools.
- Data visualization. It would be nice for your plugin to be able to show your results in a visual way so that you can get a better view of the responses.
- Ease of use. The plugin should be intuitive and beginner-friendly.
- Reviews of the plugin. Check what other users of the plugin feel about it.
Now, the moment you find your plugin, it’s very easy to install it. Here’s a tiny tutorial on how to do it.
Our WordPress survey plugin recommendations
Most of the survey WordPress plugins out there were built upon form functionalities. This is why the most popular of them have “Form” in their name. But it was only natural for form plugins to develop a survey feature as well. In the end, the functionality is the same.
Now, let’s see the recommendations:
- ContactForm by WPForms
ContactForm by WPForms has more than 4 million active installs, making it the most popular form plugin in the WordPress ecosystem. The pricing starts at $79/year and can go as high as $599, depending on your business goal.
Features that we love:
- Pre-built templates and workflows
- Conditional logic
- Powerful surveys and polls addon
- Out-of-the-box mobile responsiveness
- Beginner-friendly
- Interactive reporting
- HTML & CSS customization
- Integration with various CRMs, email marketing platforms, and survey tools (eg: Survey Monkey)
- Shortcodes
- Forminator
Forminator by WPMU is a very popular, user-friendly, and intuitive WordPress survey and forms plugin. The pricing starts at $60/year and can go as high as $190, if you own a WPMU membership.
Features that we love:
- Drag and drop visual builder
- Options to creates polls, surveys and quizzes
- Lots of integrations available with email tools
- You can build your own integrations via developer API
- Forminator block available
- Email routing options
- Shortcodes
- Gravity Forms
Gravity Forms is one of the most popular WordPress surveys and forms plugin out there. The pricing starts at $59/year and can go as high as $159, depending on your needs.
Features that we love:
- 30+ ready to use form fields
- Conditional logic
- Email notifications
- Responsive design
- Spam prevention
- Lots of integrations available with email tools
- Formidable Forms
Formidable Forms seems to be a tool used by Apple, Audi, Warner Bros, H&M, Domino’s and more. Pretty good company, I might say. is one of the most popular WordPress surveys and forms plugin out there. The pricing starts at $99/year and can go as high as $599, depending on your needs. From time to time their discounts can get as high as 50%
Features that we love:
- Drag and drop builder
- Visual styler
- Tons of templates
- Lots of integrations and addons available
- Customizations can be done via HTML or 125+ hooks
How to embed Google Form with WordPress
And because there are lots of Google Forms fans out there, I thought we could dive just a bit into how to embed Google Forms in WordPress.
I also love Google Forms, and I feel they are a great fit for surveys. They can be shared with ease across multiple sites, in social media, emails…you name it. Let’s say that Google Forms is a one-size-fits-all type of survey tool. All responses are stored in your Google Drive, and you can share results with collaborators. Information from Google Forms can be pushed through various CRMs using Zapier integrations if you want.
Now, let’s see how you can embed Google Forms into your WordPress website.
- Sign in to Google Forms
- Select a template to start with or start from scratch.

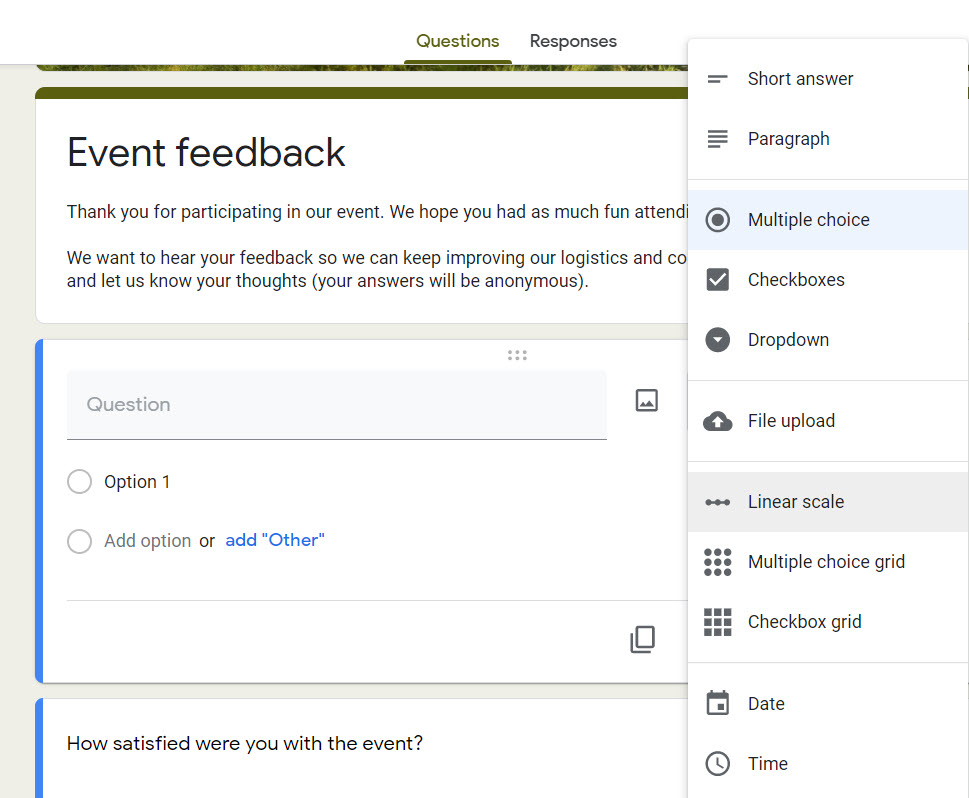
- Edit your survey: give it a title, description, add your questions and possible answers.
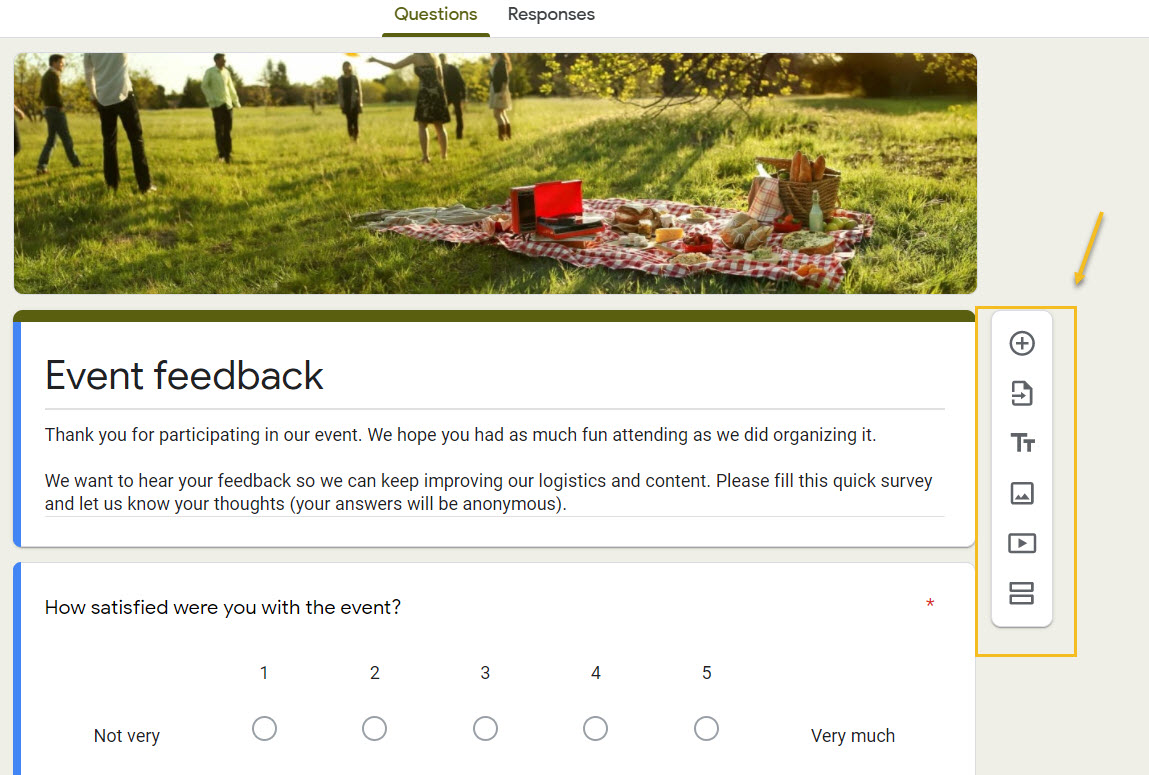
You can copy your questions and answers or delete them with ease, as well as mark them as required or not. The options are available beneath each question. I think that form editing can’t get more straightforward than this, don’t you agree?
- Make the final checks and customizations before going live with the survey.
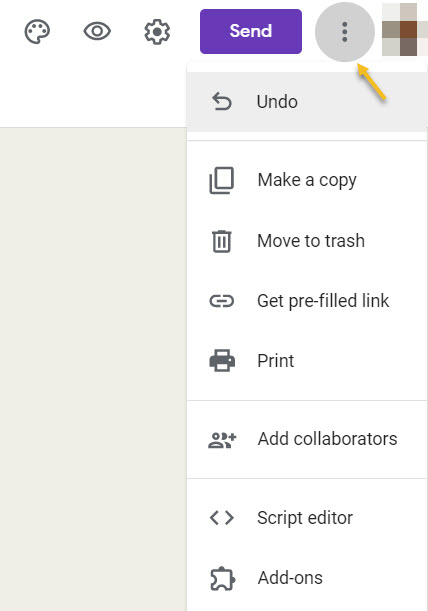
In the upper-right corner of the screen you’ll see some options for:
- Changing the theme of the form
- Previewing the form
- Making additional settings: limiting to a single response, editing after submission, showing progress bar, etc.
- Send the form/survey
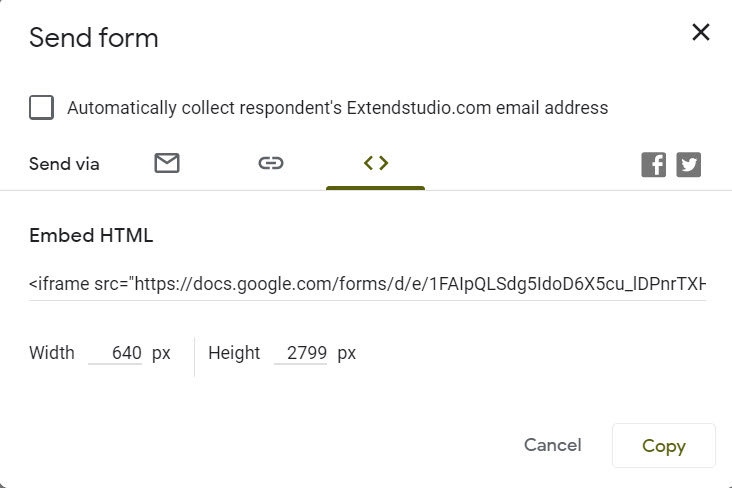
Here you have the option to share the form on social media or via email, you can even copy the link and paste it to WhatsApp, or wherever you want.
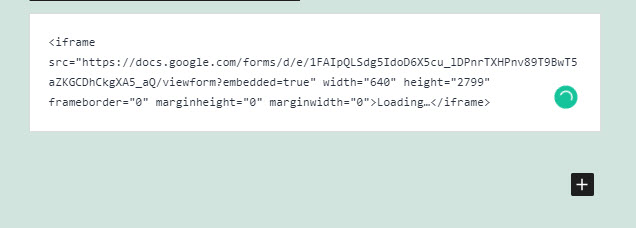
If you want to integrate it inside a WordPress page, you’ll need to go to “<>” and copy the tiny code underneath “Embed HTML”.
- Add the survey to WordPress
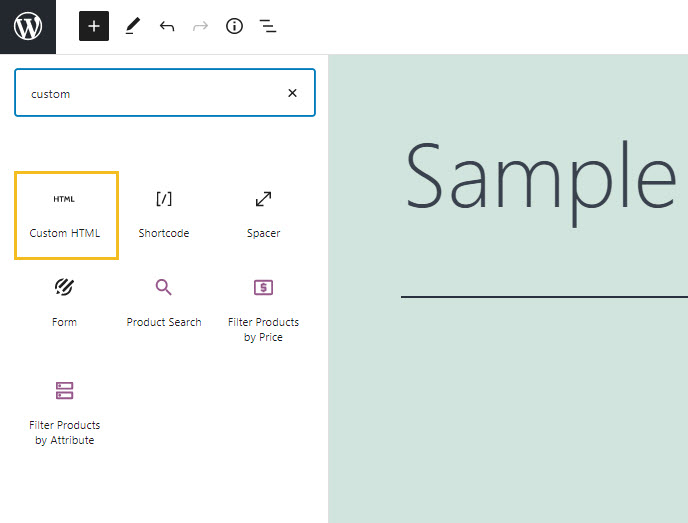
Head over to one of your pages or posts in WordPress. You can do this from the dashboard, by selecting “Pages” or “Posts”. Open a page or a post, Position your mouse cursor where you want to insert the survey. Now, it’s time to add a new block from the “+” sign in the upper-left corner. From the block list, select “Custom HTML”.
Paste the copied code to the block.
Next, you can save, preview, and publish your page or post.
Et voilà, you’ve got a nice survey on your WordPress page.
Good job, guys!
In the next chapter we’ll be talking about some good practices for survey creation, so bear with me a little bit :).
How to create a survey in WordPress using Forminator
Now that we know which are the WordPress surveys plugin recommendations, let’s take one of them for a ride.
I’m choosing Forminator for the purpose of this exercise, as well as the SkylineWP theme, together with the Colibri page builder. The builder is expanding the SkylineWP features, by giving it drag and drop options. Also, it gives me access to tens of pre-designed content blocks (among which “contacts us” forms as well). Now, most of the page builders and theme Customizers out there behave similarly. So don’t get nervous if you’re not using the same theme as I do.
Let’s create a survey!
Step 1 – Installing Forminator
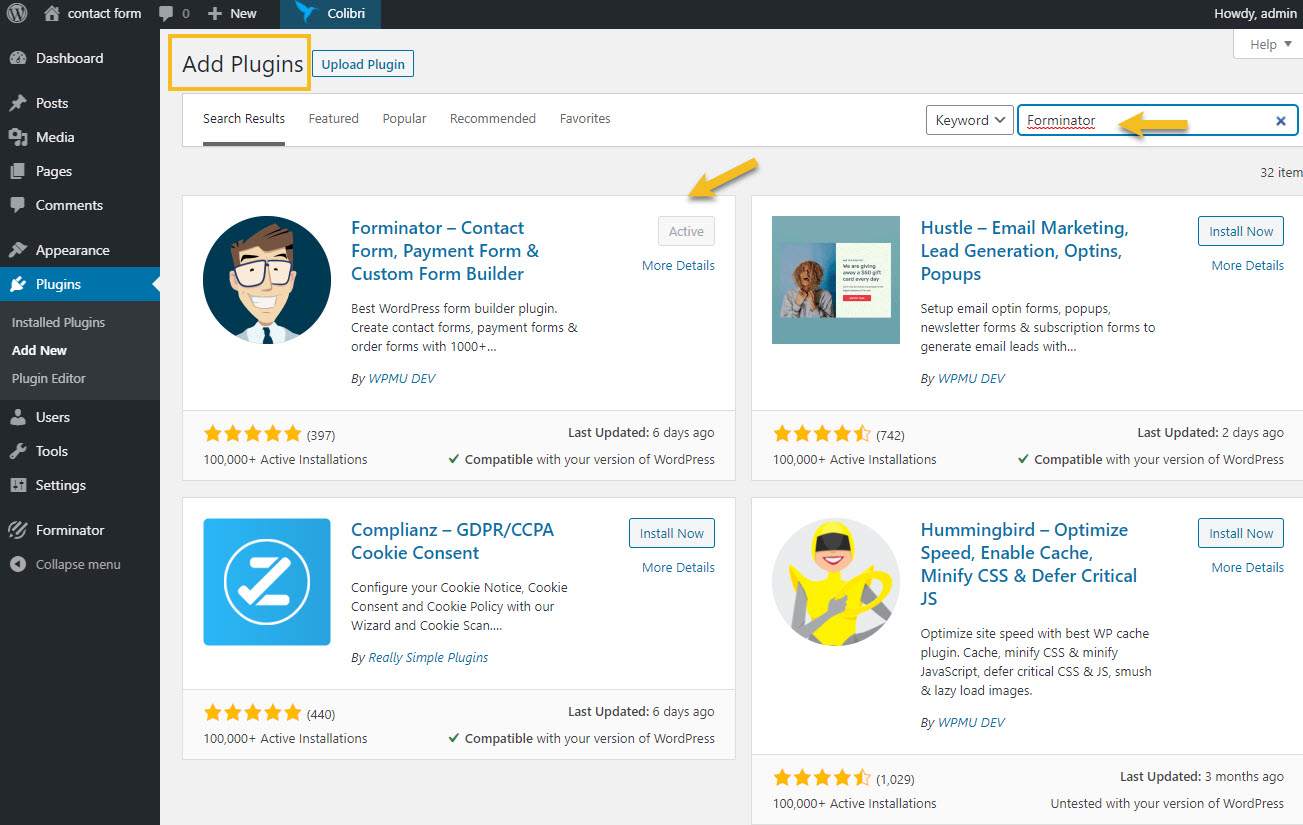
From the WordPress Dashboard, head over to Plugins->Add new. Search for “Forminator”, then select “Install Now”, then “Activate”.
Step 2 – Creating a poll using Forminator
From the Forminator menu, select poll, then click on “Create”.

Step 3 – Name your survey
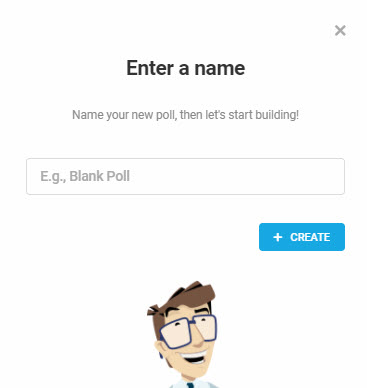
Give your survey/poll a name, then click on “Create”.
Step 4 – Customize your survey/poll
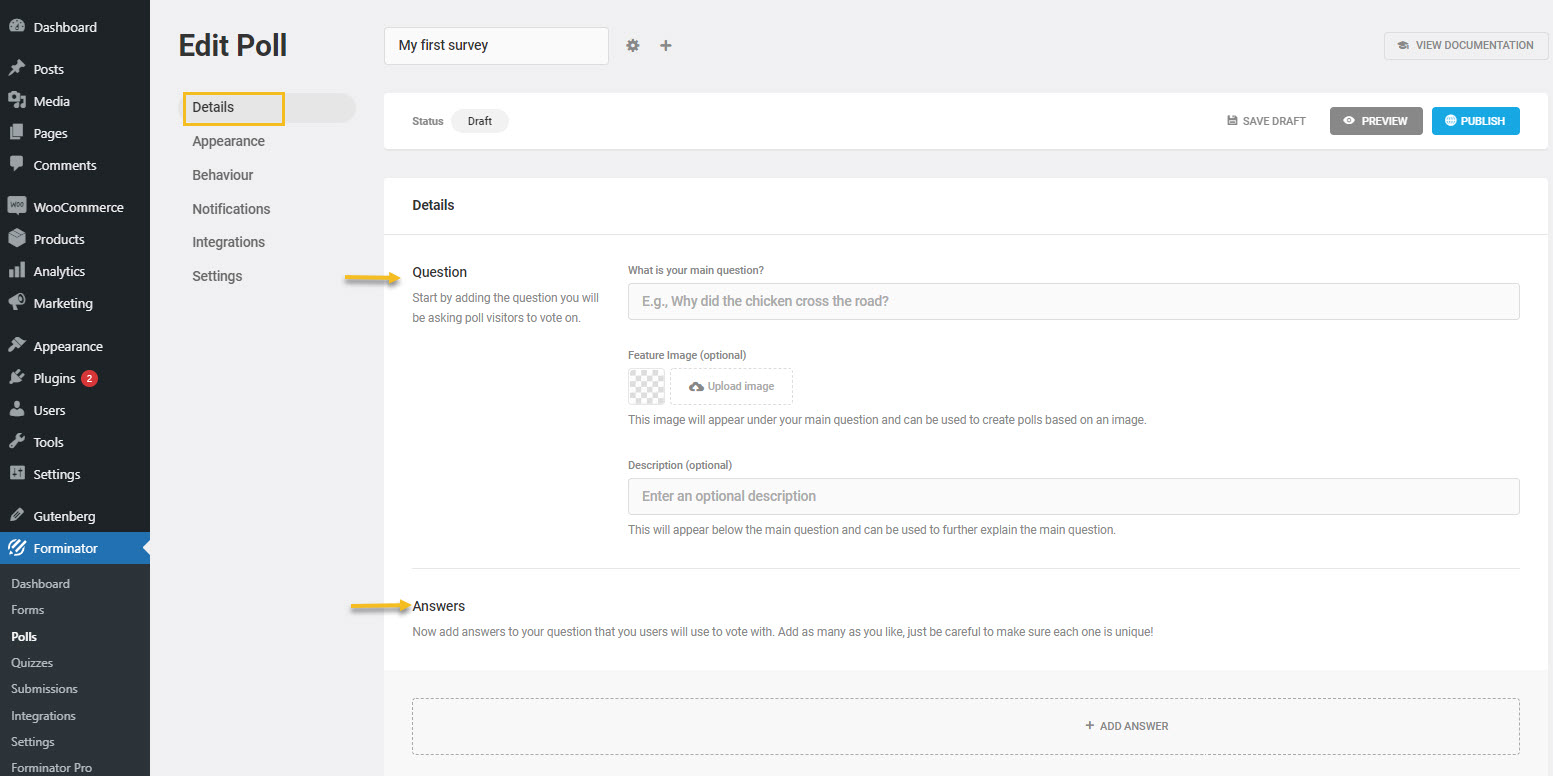
The poll editing features have several options. I’m explaining them below:
- Details – in here you establish your questions and answers
- Appearance – you can play with styling options, spacing, coloring, and even add your custom CSS.
- Behavior – here you can establish how the survey gets submitted, or even how to report the votes if this is a poll.
- Notifications – you can send a notification email to nominated email accounts when submissions come in.
- Integrations – you can connect third-party apps here.
- Settings – here you can establish what happens with users’ data.
Step 5 – Save and/or publish the survey
Inside the “Edit Poll” menu, no matter the level you are at, you can save, preview, or publish your poll.

No matter what you choose, you can see your survey inside Forminator -> Dashboard, or Forminator – Polls.
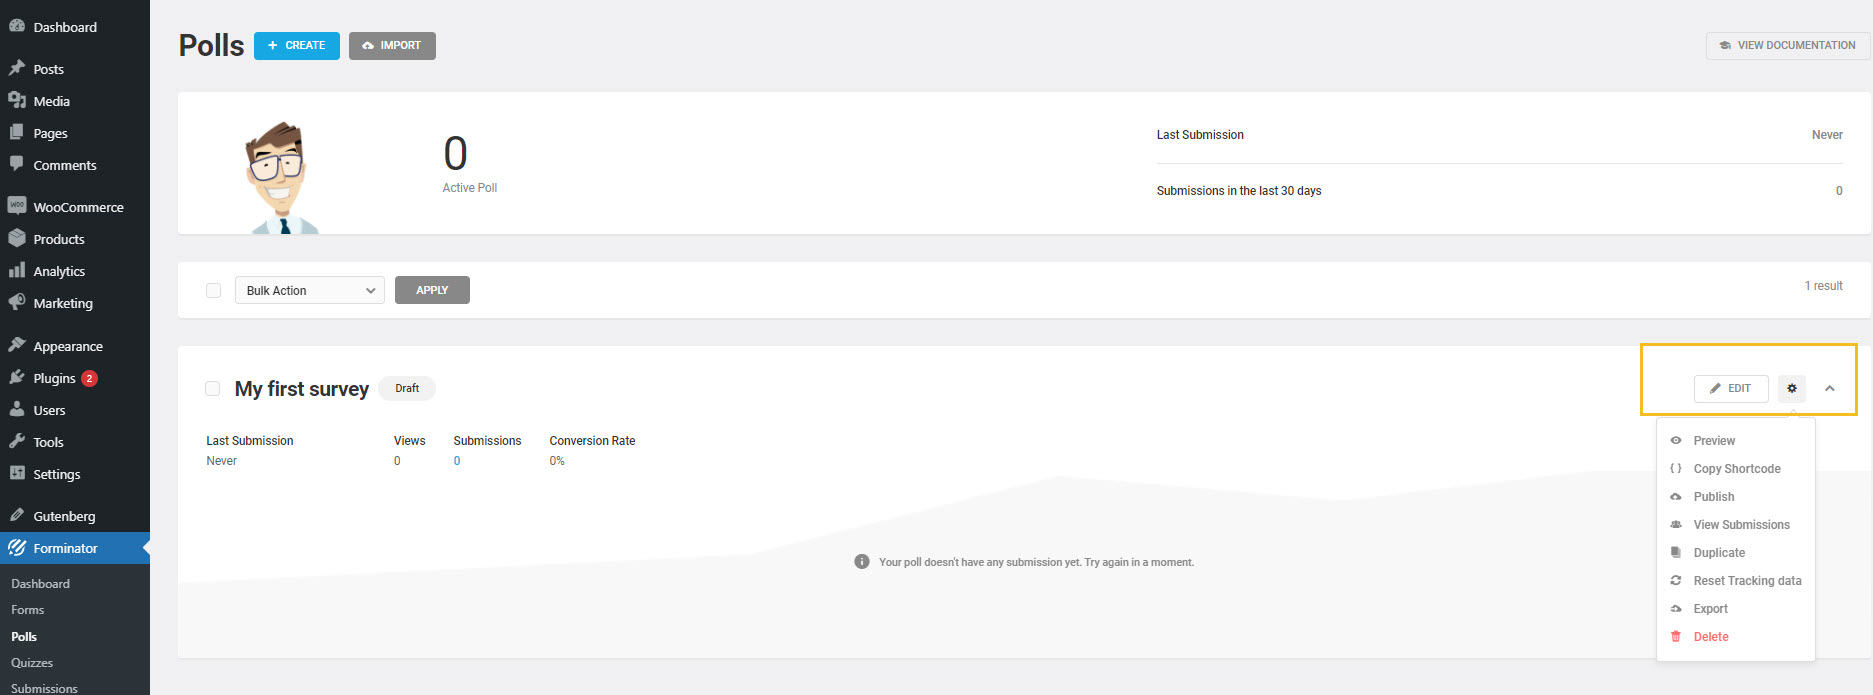
You can re-edit your survey from here, view submissions, or see a graph of data entries. One important aspect is the shortcode. You can copy your shortcode and paste it inside a page or post, and it will load your survey.
And you’re done!
Piece of cake, don’t you think?
How to create strong surveys
Let’s say you’ve selected your plugin. Now here comes the most important stuff. Creating the actual survey, asking the right questions, etc.
Now, if you want to collect reliable survey results you need to know to things:
- The survey methodology
- How to design the actual survey
Let’s start with the methodology. There is a -step process that you should follow:
- Define a clear goal for the survey. An example of such a goal could be: “ I want to find out which are the product features my customers like the most” or “I want to find out what features are missing from my product”.
- Define the target audience. You need to figure out the demographics for your survey, and the population sample size needed in order to obtain statistical significance. Also, you need to figure out how you can reach a random sample size.
- Design the survey – prepare the questions.
- Create a data analysis plan. Prepare a descriptive analysis of all independent and dependent variables, plus the measurements that need to be done: means, variances, etc.
Next, let’s get a bit into de survey design. I have some tips for you:
- Don’t make your surveys too long. You need to respect the time of the person you’re sending the survey to. You will need to prioritize your questions, else, you’ll risk having too few answers.
- Mix closed-ended questions and open-ended ones. Some closed-ended questions can be tricky if they go beyond “yes/no” or certain benchmarks. If your question has a different type of answer, you might be missing some of them, at least leave an open door for “other” as an answer. Don’t assume you know all the possible answers. It’s a trap.
- Don’t ask leading questions, meaning don’t try to give hints for possible answers. You need to keep things objective, and not influence the answers.
- Consider using incentives when asking your users to fill in a survey.
- When using scales in surveys, go for a 0 to 5 or 0 to 7 scale. Higher scales can be too confusing, and lower ones don’t make room for nuances.
- Ask the personal questions at the end of the survey (age, sex, studies, etc). You will provide a better experience if you don’t ask these questions in the beginning.
- Test the survey before going live. Make sure the required questions work, make sure it gets submitted, etc.
Aaaand, that’s a wrap, folks!
PS: Feel free to check the rest of our articles on our blog or watch Kubio tutorials on Youtube.


