Widgets are pre-designed blocks of design and functionality that can be easily integrated into various sections of a WordPress blog. The term “widget” came from combining the words wi (ndow) and (ga) dget . These are windows in which additional technical functions are displayed.
With widgets you can equip your blog with additional functions without having to touch the source code of the templates and themes directly . The WordPress standard themes already come with a number of additional widgets, some of which we will use in this article
Management of widgets in WordPress
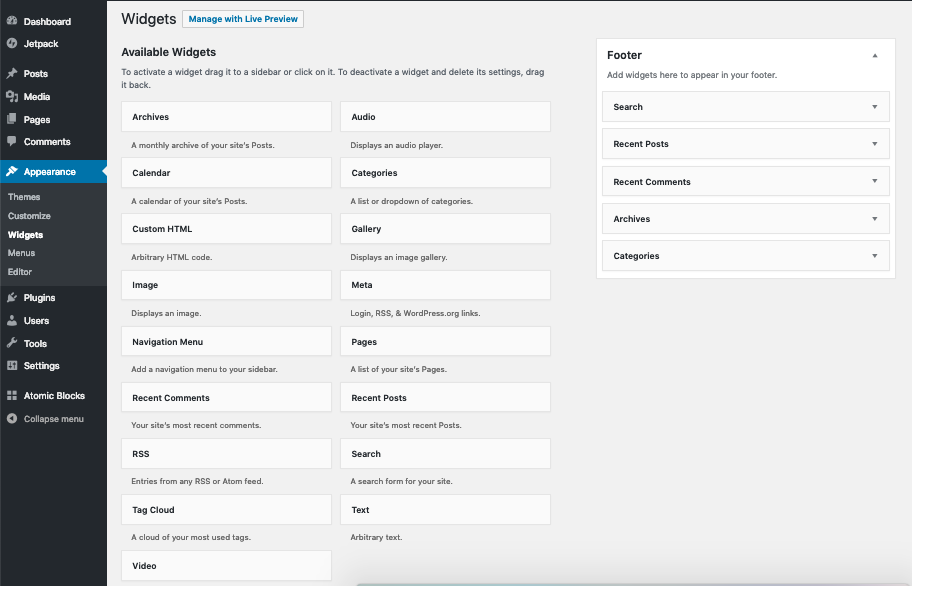
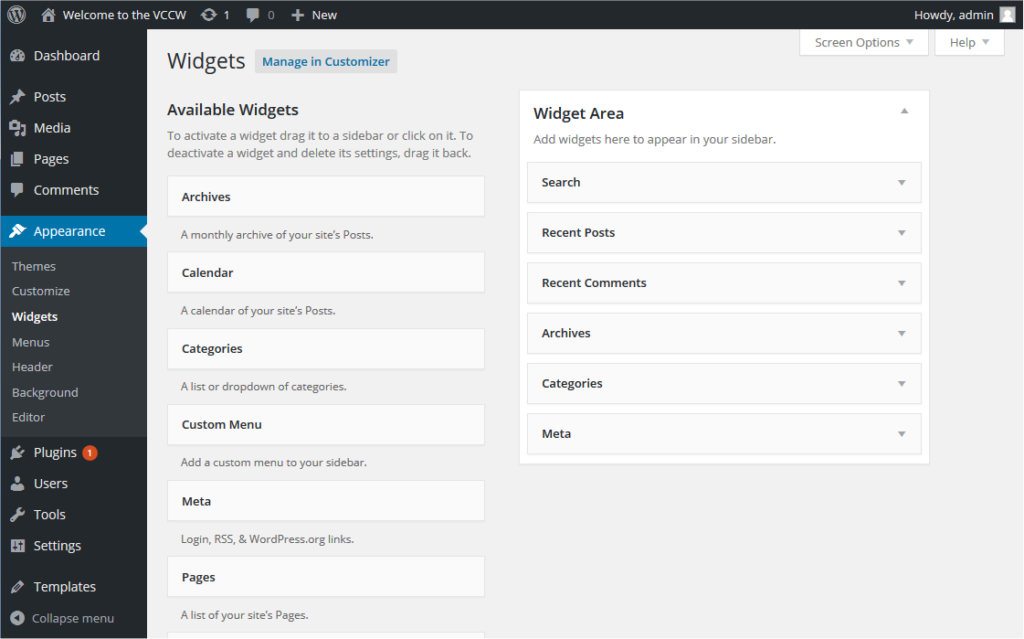
The “widget center” is located under the “Design” navigation item and there in the “Widgets” sub-item:
On the left side the available widgets are listed, on the right side you see the side areas where the widgets can be inserted. In this theme, these are the “Blog Sidebar”, “Footer 1” and “Footer 2” areas. These designations can vary depending on the theme and (as here) are not always immediately clear.
Add navigation in sidebar
A simple example: We have dynamic posts and static pages on our blog. However, our static pages are not linked yet, so there is no navigation for these pages yet. We will now add this navigation to our blog using a widget.
Simply drag the Pages widget onto the Blog Sidebar side panel.
You can enter a caption , determine the order and use “Page ID” to specify which pages should be excluded from navigation. You can find the page ID in the URL when you edit a page.
relaunch.blog/wp-admin/post.php?post=22&action=edit _ _
In this example URL, the page ID is 22. Excluding pages is quite complicated, it would be easier if the names of the pages were simply listed here and you could simply select and deselect them.
After configuring the widget, click on “Save”. The navigation should now appear on the blog:
All other widgets are also inserted in the same way: simply drag them to the appropriate area, make settings, done.
Insert widgets with the visual editor
Unfortunately, it is not always clear which areas on the page are “Footer 1” and “Footer 2”, for example, since the titles are not always clearly comprehensible. But there is a solution for that too: With the “Manage with live preview” function, you can insert the widgets into the pages via a visual editor .
To do this, click on the “Manage with live preview” button in the widget manager:
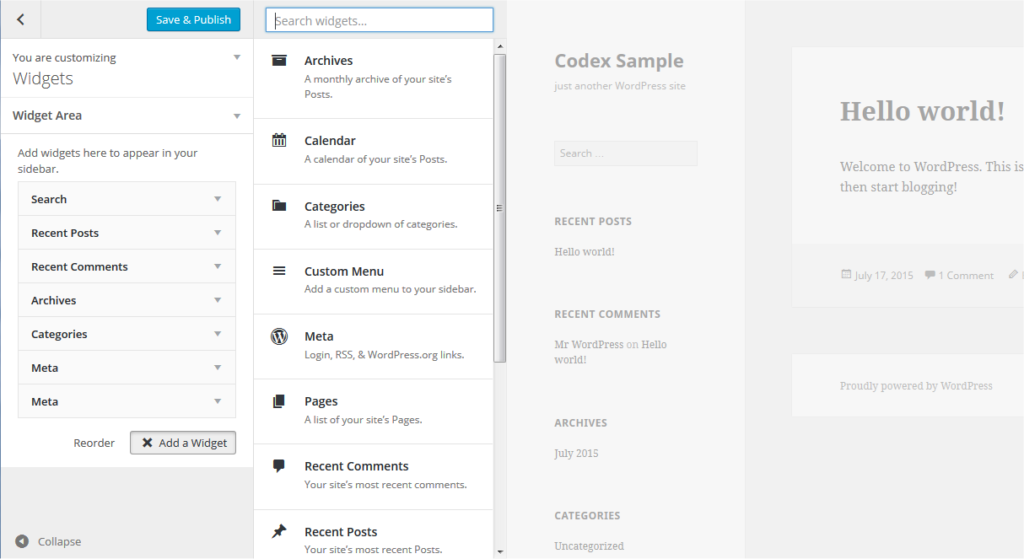
The visual editor shows your page and also the widget manager on the left. Initially, you only see the areas of the page that you can add widgets to. In this example, these are the “Blog Sidebar”, “Footer 1” and “Footer 2” areas.
We want to add our site navigation again. So click on the side panel “Blog Side Panel” and then on the button “+ Add Widget”.
In the widget selection, scroll down and there you will find the “Pages” widget. If you click on the widget, the well-known dialog for the page widget appears. In addition, the widget is already displayed on your page so that you get a preview of the widget.
If you now change the title, for example, the preview of your page will be updated immediately and you can immediately see how your changes affect the design of your widget.
After configuring the widget, click the “Publish” button at the top, only now your changes will be visible to all visitors to your WordPress blog.
Of course you can also arrange several widgets in one side area. To do this, simply click on “+Add widget” again and then select the appropriate widget. The order of the widgets can be easily changed using drag and drop.
Extend widgets with plugins
WordPress already comes with some widgets, but of course these can be expanded with additional functions. Additional widgets are installed via plugin. The installation process runs “quite normally” via the plugin directory. In the following we would like to introduce a few useful additional widgets.
Widget Logic
This plugin gives each widget an additional control field called “Widget Logic” that allows you to specify the pages you want the widget to appear on.
About the widget: https://de.wordpress.org/plugins/widget-logic/
PHP code widget
The normal text widget allows you to insert any text and/or HTML code. This widget allows adding and executing PHP code in the text widget. Only users with the unfiltered_html role are allowed to paste unfiltered HTML. This includes PHP code, so users without administrator or editor rights cannot use this, even if they have widget editing rights.
About the widget: https://de.wordpress.org/plugins/php-code-widget/
SiteOrigin Widget Bundle
The SiteOrigin Widget Bundle gives you a collection of widgets that you can use and customize. All widgets are based on a powerful framework that gives you advanced forms, unlimited colors and 1500+ icons. Once you activate a widget, you can use it anywhere standard widgets are used.
Instagram feed
Instead of your media library, you might prefer to view your images directly from Instagram. If so, you need the Instagram Feed Plugin. This widget allows you to view thumbnails, medium, and large images. You can also combine multiple Instagram accounts. The images don’t have to be from your account either – you can view images from any non-private account.
About the widget: https://en-gb.wordpress.org/plugins/instagram-feed/
Google Map widget
Want to show visitors your physical location on a map? Then you need the Google Maps Widget Plugin – a special map plugin for your widget area. With Google Maps Widget you will have a perfect map with a thumbnail and lightbox in minutes!
About the widget: https://wordpress.org/plugins/google-maps-widget/
With the widgets you have a very flexible way to equip your blog with additional functions. The visual editor gives you a direct preview of the changes in your blog and you can try out the various widgets without risk. There are a variety of useful widgets, these are installed like plugins and are then available in the widget manager.
If you want to build your own custom WordPress website you can choose KubioBuilder. You can access a lot of templates, sections and many other options so that you can build your website as you like.
Feel free to check the rest of our articles on our blog or watch Kubio tutorials on Youtube.


