
Have you ever landed on a website page that says, “Page Not Found”? Frustrating, isn’t it? That’s what happens when you run into a 404 error page. In WordPress, this typically happens when the URL you’re trying to access doesn’t exist anymore or never did. But did you know that you can customize this dead-end into a helpful and engaging experience for your visitors?
A well-designed custom 404 page can significantly improve user experience, reduce bounce rates, and ensure your branding remains consistent across your site. Instead of leaving your visitors stranded, a custom 404 page provides clear paths to relevant content, keeping them engaged and encouraging further exploration of your site.
In this guide, we’ll show you how to create a custom 404 page. Stick with us to learn the step-by-step process and best practices for crafting a 404 page that helps your users and boosts your site’s SEO and overall professionalism.
Why customizing your WordPress 404 page matters
It’s easy to overlook the 404 error page on your WordPress site, but it is actually pretty important. When a visitor stumbles upon a well-crafted 404 page, it can keep them engaged and guide them back to relevant content, reducing frustration and confusion.
A thoughtfully designed 404 page informs users that the page they were looking for isn’t available, while also aligning with your website’s design and tone. By providing clear navigation options, you can reduce bounce rates and encourage visitors to explore further, showing that you value their experience on your site.
From an SEO perspective, search engines pay attention to user experience as a ranking factor. A custom 404 page can help search engines better understand your site’s structure and improve internal linking, contributing positively to your site’s SEO.
Understanding the default WordPress 404 page
When a user tries to access a non-existent page on your WordPress site, it will automatically redirect to a default 404 page. This default page simply informs users that the requested page could not be found, typically displaying a generic “Not Found” message and a search bar to help them locate the content they were looking for.
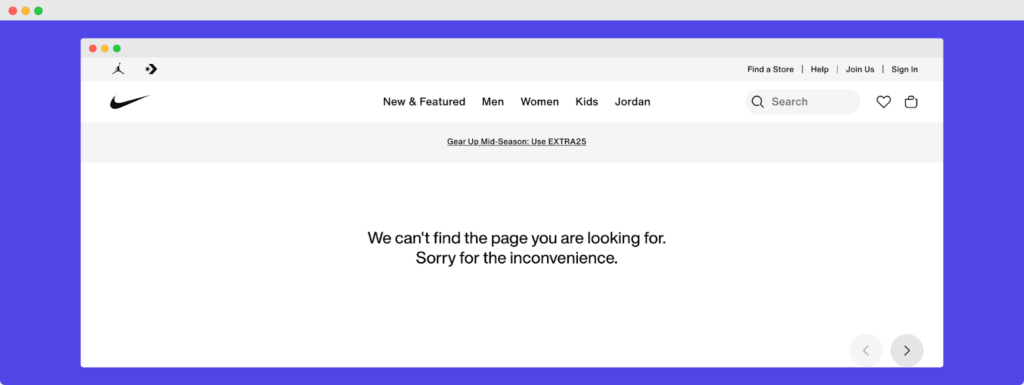
However, the default 404 page has several limitations. It lacks customization, meaning it often doesn’t align with your website’s design or branding. This can make your site less professional and user-friendly. Along with this, the default page offers limited guidance, which can frustrate users and increase bounce rates as they may quickly leave your site out of confusion.
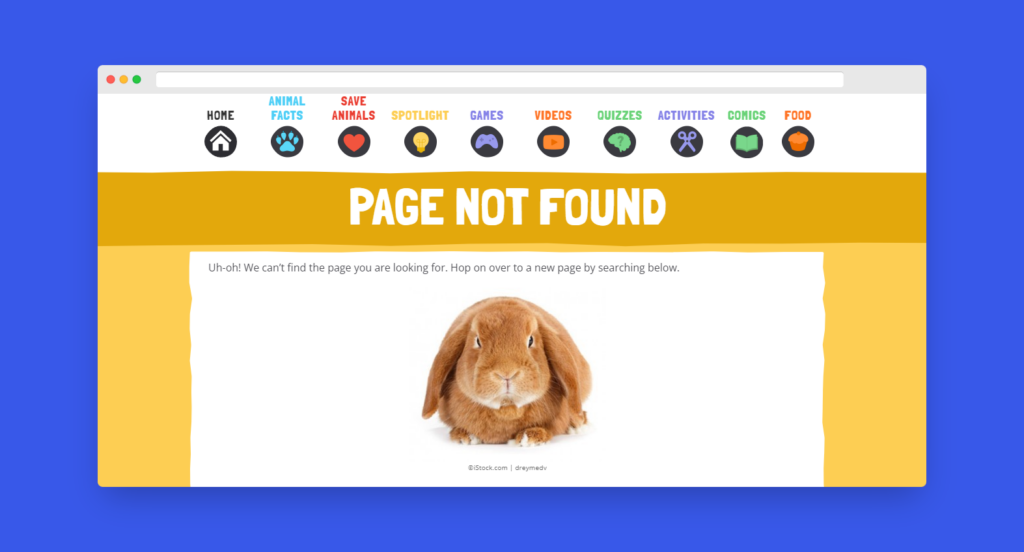
Most importantly, the default 404 page misses a valuable opportunity to engage users and direct them back to relevant content or important pages. By customizing your 404 page, you can transform this potential dead-end into a chance to keep users on your site and enhance their overall experience.
Methods for customizing your WordPress 404 page
There are several ways to customize your WordPress 404 page, each with its own advantages and challenges:
Direct theme file editing
One way to customize your 404 page is by directly editing your theme’s 404.php file. This method requires some knowledge of HTML, CSS, and PHP. Here are the steps:
- Find the 404.php file in your theme’s directory.
- Create a child theme (if not already using one) to preserve changes during theme updates.
- Modify the 404.php file to include your custom design and content.
| Advantages | Disadvantages |
| Full control over the 404 page’s appearance and functionality. | Requires technical skills and can be time-consuming. |
Implementing WordPress plugins
For those who prefer a bare-bones approach, using WordPress plugins specifically designed for creating custom 404 pages is a fine option. Some popular plugins include:
| Advantages | Disadvantages |
| Easy to use with pre-designed templates and customization options. | Limited design flexibility compared to page builders or direct file editing. |
Steps to use a 404 page plugin:
- Install and activate the plugin.
- Configure the plugin settings and customize the 404 page design.
- Publish your custom 404 page.
Using page builders
For those who want maximum flexibility without coding, a page builder like Kubio is your best bet. Kubio allows you to create a custom 404 page with ease, with features for creating a custom 404 page:
- Drag-and-drop interface for easy design customization.
- Pre-designed 404 page templates for quick setup.
- Responsive design options to ensure your 404 page looks great on all devices.
- Customizable elements such as headings, text, images, and buttons.
- Integration with WordPress for effortless publishing and management.
Step-by-step guide: Customizing your 404 page with Kubio
Kubio AI offers a powerful and intuitive way to create a custom 404 page for your WordPress site. Its capabilities allow you to design a page that not only looks professional but also enhances user experience. Here’s how you can customize your 404 page using Kubio:
- Log into your WordPress dashboard and open your website in Kubio builder.
- In the Kubio interface, go to the template library where you can find various pre-designed templates.
- Click on the Pages tab and use the search function to find templates specifically designed for 404 error pages.
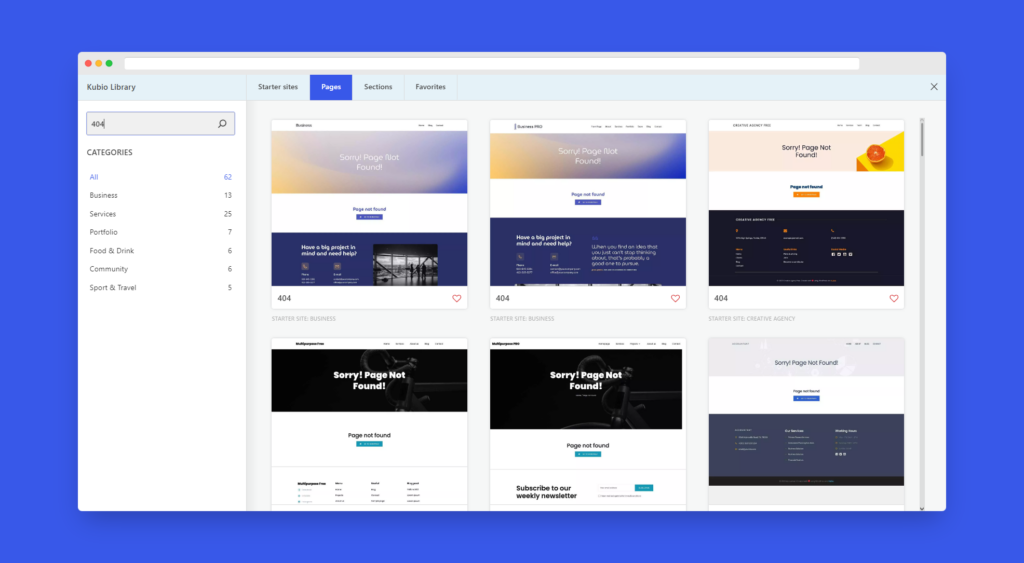
- Browse through the available 404 templates and choose one that best matches your site’s aesthetic and needs.
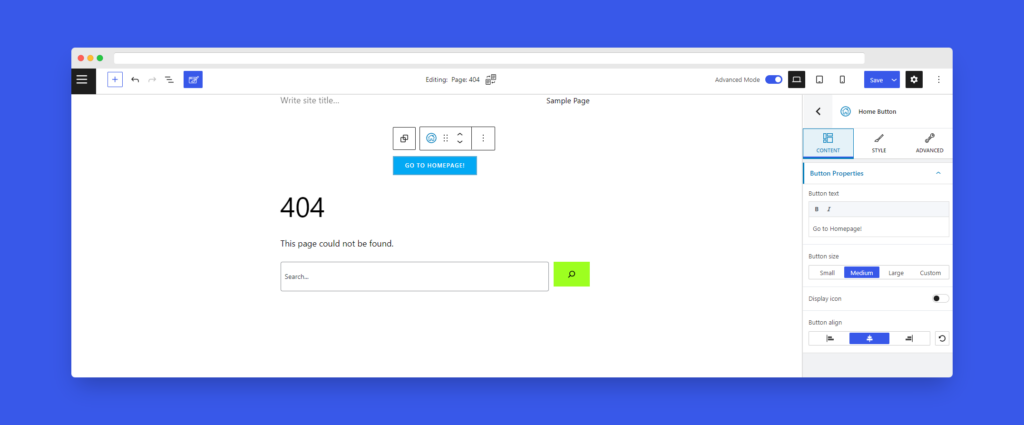
- Customize templates by editing text and images. Kubio AI’s editing tools make it easy to tailor the content to fit your branding. You can also use Kubio’s image search and generation tools to find or create visuals that enhance the page’s design.
- Users can access the 404 page directly from the editor by going to Top Left Menu → Advanced → Templates → General Templates → 404. Additionally, there is a block called Home Button specifically designed for the 404 page, allowing users to add a quick navigation link back to the homepage easily.
Benefits of using Kubio AI
- Saves time: Kubio AI provides a starting point for your 404 page design, allowing you to quickly set up a professional-looking page.
- Professional-looking drafts: The pre-designed templates ensure your 404 page aligns with your website’s style, maintaining consistency and professionalism.
- User-friendly: The drag-and-drop interface makes customization easy, even for those without technical skills.
- Versatility: Kubio supports various design elements, including headings, text, images, and buttons, giving you full creative control.
- Responsive design: Ensures your 404 page looks great on all devices, enhancing the user experience across platforms.
- Enhanced SEO: A well-designed 404 page can reduce bounce rates and improve user engagement, which can positively affect your SEO rankings.
- Integration: Kubio integrates with WordPress, making it easy to manage and update your custom 404 page alongside your other site content.
Kubio’s drag-and-drop editor is user-friendly and highly versatile. Here’s what you can do with it:
- Modify layout: Add, remove, or rearrange elements with ease to create a layout that suits your design vision.
- Customize elements: Adjust the background, colors, fonts, and images to match your brand. Each element can be tailored to fit the overall aesthetic of your site.
- Responsive design: Ensure your 404 page looks great on all devices, from desktops to smartphones.
Best practices for designing a user-friendly 404 page
Designing a user-friendly 404 page is essential for keeping visitors engaged and maintaining a positive impression of your website. Here’s how:
Keep the design consistent with your website
Maintaining branding elements such as colors, fonts, and logos on your 404 page is important. A consistent design helps users recognize they are still on your website, which can reduce frustration and confusion.
Kubio can help with this with its drag-and-drop interface that allows you to easily incorporate your brand’s colors, fonts, and logos. You can also start with pre-designed templates that align with your overall site design, then tweak them to match your branding precisely.
Use clear and concise messaging
Explain to users that the requested page could not be found. Apologize for the inconvenience and provide brief, easy-to-understand instructions on what to do next. Clear messaging helps users know they haven’t reached a dead end.
Kubio’s intuitive text editing tools allow you to craft and format clear messages – you can even be fun with it if you would like! Use templates to ensure your apology and instructions are professional and empathetic.
Include a search bar
A search bar is essential on a 404 page, enabling users to quickly find the content they were looking for. Place it prominently to enhance its visibility. You can easily add a functional search bar to your 404 page using Kubio’s widget tools!
Provide helpful links
Including links to popular pages, categories, or resources can guide users back to valuable content. A Home Button is especially important, as it allows users to quickly navigate back to your main page and start fresh. Along with this, a navigation menu or sitemap can further help users find their way.
Use Kubio’s link and menu widgets to add helpful links, a Home Button, and navigation menus to your 404 page. Make sure the links are relevant and up-to-date by using Kubio’s dynamic content features.
Incorporate visuals
Engaging visuals such as images, illustrations, or videos that align with your brand can reduce frustration and enhance the user experience. Avoid generic visuals that don’t add value.
Mobile-friendliness
Make sure your 404 page is responsive and displays correctly on mobile devices. A mobile-friendly layout and appropriate font sizes improve the user experience across different devices.
Kubio automatically optimizes your 404 page for mobile devices, ensuring it looks great on screens of all sizes. Use Kubio’s preview features to test your 404 page on various devices and make adjustments as needed.
Maintaining and optimizing your custom 404 page
The secret to any successful website is maintenance and optimization. Here are the best ways to keep your custom 404 page effective and up-to-date:
Regularly test your 404 page
- Periodic checks: Make it a habit to periodically check your 404 page to ensure it’s functioning correctly. This includes testing all links, the search bar, and any other interactive elements.
- Design consistency: Verify that the 404 page design remains consistent with any updates to your website. This ensures a great user experience.
Monitor 404 errors
- Tracking tools: Use tools like Google Search Console or Google Analytics to monitor and track 404 errors. These tools can help you identify which pages frequently lead to 404 errors.
- Error analysis: Investigate the causes of 404 errors, whether they’re due to broken links, deleted pages, or typos.
- Email alerts: Set up email alerts to be notified promptly of any 404 errors. This enables quick fixes and minimizes user disruption.
Implement 301 redirects
- Permanent redirects: For pages that are permanently removed, set up 301 redirects to guide users to relevant alternative pages. This helps maintain your site’s SEO value and enhances user experience.
- Redirect management: Regularly update and manage your 301 redirects to ensure they remain effective and relevant.
Update your 404 page content
- Content review: Keep the content on your 404 page up-to-date. Regularly review and update links, resources, and messaging to ensure they are current.
- Reflect changes: Make sure that any changes to your website’s structure or navigation are reflected on the 404 page. This keeps your site’s user experience cohesive and intuitive.
Elevate your website with a custom 404 page
A well-designed 404 page significantly enhances user experience and SEO. By maintaining a professional and cohesive look, a custom 404 page reassures visitors that they are still on your site and guides them back to relevant content.
Using Kubio for 404 page customization offers several advantages. Its intuitive interface and pre-designed templates make it easy and time-efficient to create a professional, responsive 404 page without any coding skills. This ensures your website remains visually appealing and functional across all devices.
Start customizing with Kubio today to elevate your website and turn potential frustrations into opportunities for engagement. Remember, a custom 404 page is a valuable asset for any website, contributing to a positive user experience.
Let’s turn those “Page Not Found” moments into opportunities!