

You have already successfully installed WordPress and now want to create or edit a WordPress menu? In this article you will find out how to customize WordPress menu so that it will look good and function well.
Things to prepare when you will customize WordPress menu for the first time
Before we create our menu, it’s a good idea if you first create all the pages, categories, etc. that you want in your menu . Then you don’t have to keep interrupting the editing of the menu later while we are creating the menu.
You should also have thought about how you want to set up your menu and what structure it should have . Because the main menu in particular (usually at the top of the navigation bar) gives your website a structure in terms of content and is the primary navigation element for your visitors. The main menu gives your visitors a rough overview of your website and its content. So it is an important factor for the user experience!
Create or edit a WordPress menu – the instructions
To get to the WordPress menus, simply click on “Design” on the left and then “Menus”. If demo data is already installed in your WordPress, you may already see a menu there. Then you have to click on the link “create a new menu” at the top.
You can now enter the name under “Name of the menu” and then click on “Create menu” on the right. Now your created menu has to be filled with the appropriate pages, categories, etc.

You may see other/additional types of menu items on the left than on the screenshot. That depends on your theme, because some themes add other types here, such as portfolios. However, certain types of menu items such as pages, posts, categories, individual links, etc. are always available by default and independent of the theme.
Add menu items to the menu
Now comes the point where the preparation pays off: On the left side you will now find all the pages, posts and categories you have created. All you have to do here is tick the checkboxes and then click on “Add to menu” , then the selected menu items will appear on the right in your menu.
The most recently created pages are displayed here by default. You can also display all or search for specific pages. On the left above the list with the checkboxes you will find the tabs where you can switch from “last created” to “show all”.
Add your own/custom links to the menu
You can add custom links to your menu in the same way as normal pages: You just have to manually enter the URL and the link text/anchor text yourself.
When do you need custom links in WordPress menu
With the individual links you can choose the link/URL freely. You can enter any desired link target there. This is required if you want to link to an external website, for example, or if your link target/page is not listed in the menu items on the left because it is not of the WordPress type “Page”, “Post” or “Category”. The individual links are also used to link to pages with an anchor point (URL with #) and as a parent menu item for dropdowns/submenus.
Sort menu entries or change the order
Changing the order of menu items is very easy: just click and hold on a menu item while dragging it and release it at the desired position. So the whole thing works via drag and drop .
Another important thing to know: The menu item that is displayed at the top of the list is in a horizontal menu on the far left.
Create dropdown / submenu
With you, all menu items are probably currently arranged on one level. However, several levels are also possible in order to create such a submenu.
To create a submenu, all you have to do is drag and drop the desired menu item a little to the right until it indents one level to the right. That was all that was needed. You should now see the submenu in your menu bar.

Create WordPress submenu
Tip: create a non-clickable menu / menu item
So that a menu item is not clickable, such as for a menu item that has a submenu, you have to create an individual link. You can freely choose the link text, this is the displayed name of the menu item. But the magic is in the “URL” field: You have to enter a hashtag (#) there to make the menu entry non-clickable.
Create WordPress menu custom links
Set / change the position of the menu
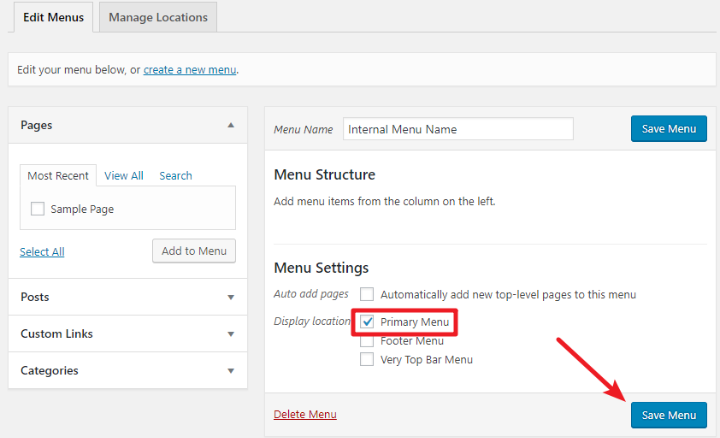
Just creating the menu is not enough, because it is also important that you determine at which position on your page the menu should be displayed. Because a website doesn’t just have a menu at the top, for example, but also several menus, such as those in the footer.
Which positions are available here is determined by your theme. You now have to select which of your menus should be displayed at which position. To do this, go back to Design -> Menus -> at the top of the tab “Manage Positions”. Here you can make the setting.
Use WordPress menu in widgets (e.g. in the footer or sidebar)
Any menu can also be used and displayed by default in the widgets. Simply go to “Design” on the left and then “Widgets” to get to the widgets. Here you can now see the “Navigation Menu” widget on the left side of the available widgets. You simply have to drag this navigation menu to the right into your desired widget area. If you unfold the navigation menu you can enter a title there and choose which of your created menus should be used.
Tip: You can also create your own menus for your widgets, for example to have a different menu in the footer than in the main navigation above.
Conclusion
You can easily create a WordPress menu for your website by following these steps above. Also you can edit & customize your menu as you like if you want to add a bit of personalization to it.
Feel free to check the rest of our articles on our blog or watch Kubio tutorials on Youtube.